

Why a Default WooCommerce Shop Page Is Holding You Back
Out of the box, WooCommerce gives you a functional but visually rigid shop page. The default layout often clashes with your brand, limits storytelling, and makes it tough to highlight specific product categories or run targeted promotions. For store owners and developers who crave design freedom, Elementor Pro unlocks a completely custom WooCommerce shop page without writing a single line of PHP.
This guide walks you through the entire process — from planning your layout to troubleshooting common pitfalls — so you can launch a high-converting, fully tailored shop experience in 2025. Whether you’re building a niche boutique or a multi-category marketplace, the principles here scale perfectly.
What You Need Before You Start
A smooth workflow depends on having the right tools in place. Here’s your minimum checklist:
- WordPress (latest version) with WooCommerce installed and at least a few products added.
- Elementor Pro (active license) — the Theme Builder is a Pro feature, and you’ll need it to override the default shop template.
- A solid, Elementor-compatible theme (Hello Elementor is a safe choice, but any lightweight theme works).
- Basic familiarity with Elementor’s interface, especially flexbox containers and dynamic tags (the guide includes clear examples).
If you’re also planning to collect custom data on product pages or build advanced filtering interfaces, consider extending Elementor’s capabilities with ACF Frontend Pro For Elementor. It’s a 100% clean, virus-free premium GPL alternative available at an affordable price (৳490) on BanglaDock, and you get lifetime updates — perfect for creating fully dynamic, editable product catalogues without touching code.
Step 1: Plan Your Custom Shop Layout (Wireframe First)
Jumping straight into Elementor is tempting, but a quick wireframe saves hours. Sketch the sections you want:
- A hero banner with a search bar or call-to-action.
- Category quick links or a styled grid of product categories.
- The main product loop — this is the core.
- Sidebar or filter area (if any).
- Promotional rows, testimonial blocks, or trust badges.
Think mobile-first. A two‑column sidebar might look great on desktop, but on mobile the product grid must be the hero. Sketch the reordering of sections for smaller screens early.
Step 2: Create a New Theme Builder Template
Inside your WordPress admin, navigate to Templates → Theme Builder in Elementor. You’re after the Products Archive template type — that’s what controls the default WooCommerce shop page, category pages, and tag archives.
- Click Add New and select Products Archive from the dropdown.
- Name it something obvious (“Main Shop Page” works).
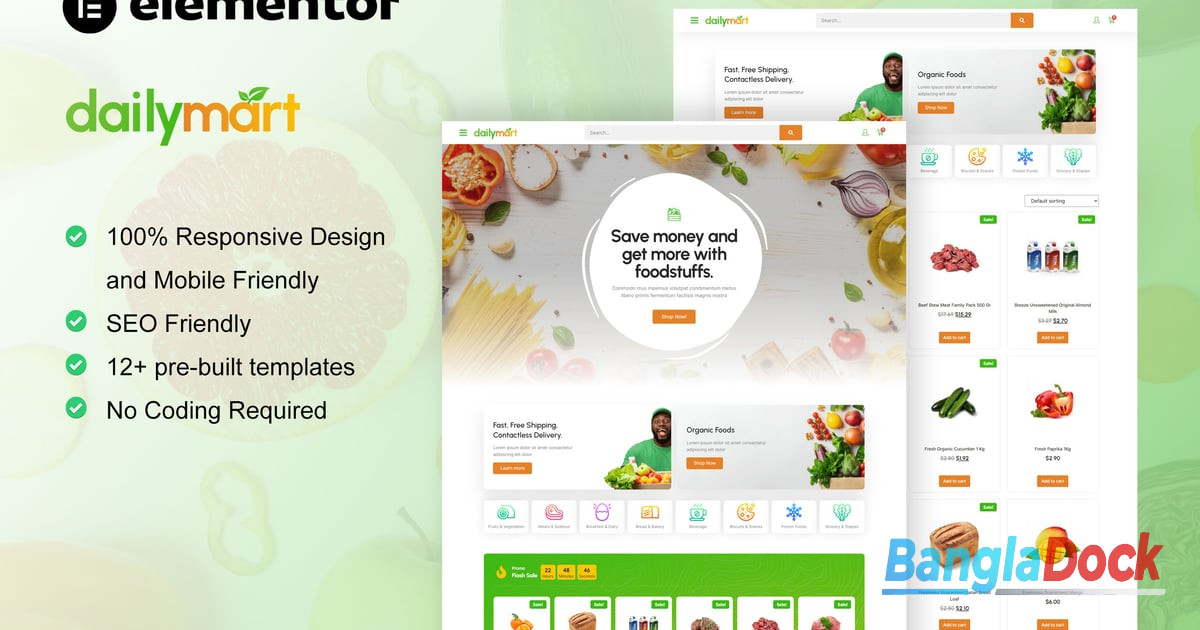
- Elementor will ask if you want to start from a blank canvas or a pre‑designed block. For a truly custom WooCommerce shop page, choose Blank or use a lightweight kit like DailyMart – Grocery Store Elementor Template Kit. The DailyMart kit gives you a professional, grocery‑styled starting point that’s easy to recolor and repurpose for any niche.
- Define display conditions: set it to All Products Archives or specifically “Shop Page” if you want a separate design from category pages.
Step 3: Build the Header and Hero Section
Use Elementor’s standard widgets — Heading, Text Editor, Button, and maybe an Image or a Lottie animation — to craft an attention-grabbing top section. Keep it brief; the main action is scrolling to the products. One under‑used trick: insert a Search Form widget with the “Ajax” style enabled, so customers can instantly filter products without page reloads.
For dynamic personalized greetings (e.g., “Welcome back, [username]”), use Elementor’s dynamic tags with the user’s display name. That small touch can improve engagement and trust.
Step 4: Add the Product Loop (The Core of Your WooCommerce Shop Page)
This is where Elementor Pro’s Loop Grid or Archive Products widget shines. Drag the Products widget (or the older “Archive Products” widget — both work) onto the canvas. You’ll immediately see a default grid. Tweak it in three critical layers:
4.1. Layout & Columns
Set columns to 3 or 4 for desktop, but switch to 2 for tablet and 1 for mobile if your product images need breathing room. Use the new Container‑based layout for finer gap control without custom CSS.
4.2. Card Styling & Dynamic Content
Click on the product card inside the widget to customize the image ratio, overlay colors, button text (e.g., “Quick View” instead of “Add to cart”), and typography. Elementor’s dynamic tag system lets you pull in custom fields or sale badges conditionally. If you’re managing a large inventory, integrating Advanced Custom Fields with ACF Frontend Pro For Elementor means you can show a unique “Eco Rating” or “Shipping Time” badge dynamically on each card without cluttering the product description.
4.3. Pagination & Load More
Choose between infinite scroll, “Load More” button, or classic pagination. Infinite scroll can keep users engaged, but if your footer contains important links (privacy policy, returns), a “Load More” button is often better for UX and SEO crawlability.
Step 5: Inject Advanced Filtering for a Better Shopping Experience
By default, WooCommerce sidebar filters are limited. With Elementor Pro, you can place a Filterable Gallery (for simple setups) or use an Ajax‑based product filter plugin. If you go the plugin route, ensure it outputs the filter controls as widgets you can place inside an Elementor sidebar or off‑canvas container.
I often place a dedicated filter bar just above the product grid on mobile — designers sometimes forget that mobile users need obvious filtering, not hidden sidebar filters. Make the “Sort by” dropdown prominent, and consider pill‑style category toggles for a more app‑like feel.
Step 6: Enhance with Cross‑Sells, Testimonials, and Trust Sections
An effective shop page isn’t just a grid. Add social proof: you can pull Testimonial widgets from Elementor’s library or use a plugin to fetch recent reviews. Place a “Recently Viewed” or “Frequently Bought Together” section using a secondary loop grid below the main products — it boosts average order value without appearing pushy.
If your store sells digital goods or requires contracts, consider embedding a signature request directly on the checkout or product page. WP E-Signature – Bundle with all addons lets you legally capture signatures when selling services or custom orders, adding an extra layer of professionalism and compliance.
Step 7: Mobile Optimization & Performance Tweaks
A custom WooCommerce shop page looks beautiful on a 27‑inch monitor, but over 60% of e‑commerce traffic now comes from mobile. A few vital checks:
- Disable elements that re‑render on scroll (like parallax images) on mobile views via the responsive settings.
- Set explicit image dimensions for product thumbnails to reduce layout shift.
- Test the tap‑target size of add‑to‑cart buttons — at least 48×48px, per WCAG.
- Limit the use of heavy hero sliders; a single static banner often loads faster and converts better.
Performance is also an SEO factor. After finalizing your design, run the site through PageSpeed Insights. If you’re looking to deepen your technical SEO knowledge and understand exactly how Google judges your new shop page, the comparison guide Rank Math Pro vs Yoast SEO: Why Rank Math is Winning the SEO Battle in 2026 provides actionable context on structured data, product schema, and more. Combined with a solid Rank Math Pro Setup Guide: Optimize Your WordPress Content for Google Rank, you’ll be fully equipped to index your product pages effectively.
Common Mistakes That Break a Custom Shop Page
Even experienced developers slip up. Watch out for these pitfalls:
- Forgetting to assign display conditions correctly: if you set the template to “All Archives,” it will override category pages too. That might be desirable or a complete disaster — decide based on your design.
- Using static product lists instead of the dynamic Loop: a static “Products” widget with manually chosen products doesn’t update automatically. Always use the Archive Products or Loop Grid with the source set to “Current Query” for the actual shop page.
- Overloading the hero with animations: users on slower connections may bounce before the first product appears.
- Inconsistent image aspect ratios: if product images vary widely, force a crop ratio via WooCommerce settings (Customizer → WooCommerce → Product Images) and then re‑generate thumbnails.
- Leaving the sidebar active in the Theme Builder template: check your theme settings — if your theme forces a sidebar, you might see double sidebars or unexpected breaks.
Troubleshooting: When the Products Don’t Show Up
Almost every developer hits the “empty product grid” scare at least once. Here’s a diagnostic checklist:
- Check the preview source: in the Elementor editor, under the Archive Products widget, ensure the “Query” is set to “Current Query” and not “Related” or “Up Sells.”
- Publish the template, then view the actual shop page: the live frontend may render differently than the editor’s preview. Editor preview sometimes falls back to a generic loop.
- Conflict with another template: if you have a secondary Products Archive template with higher priority, it might override yours. Go to Templates → Theme Builder and check for duplicates.
- Permalink or rewrite flush: after major changes, go to Settings → Permalinks and simply click “Save Changes” to flush rewrite rules.
- Plugin interference: temporarily disable any product filter or catalog mode plugins to see if they’re hiding the loop.
Going Further: Dynamic Product Forms and CTAs
A custom shop page becomes a conversion engine when you embed interactive elements. For stores that require custom product configuration or lead capture before purchase, combining Elementor forms with product data is a game‑changer. WPForms Pro Bundle + All Addons enables advanced conditional logic, file uploads, and payment integrations that sit right inside your product grid or quick‑view modals. Use it to offer a “Request a Quote” button on variable products, or collect bulk order inquiries without distracting from the purchase flow.
Once you’ve got the shop page designed and SEO‑optimized, continue refining by monitoring click maps and user recordings. The flexibility you gain with Elementor Pro means you can iterate in hours, not weeks.
Best Practices for a High‑Converting, SEO‑Ready Shop Page
- Stick to a clear visual hierarchy: hero → navigation/sorting → product grid → pagination → secondary content.
- Use semantic HTML: Elementor’s heading widgets should follow a logical order (H1 for the page title, H2 for category names, H3 for product titles).
- Optimize product image alt text: WooCommerce uses the product title by default, but you can enhance it via snippet or plugin to include key product attributes.
- Enable lazy loading for product images — not just native lazy loading, but also Elementor’s “Lazy Load” option on background images if used.
- Always test with real orders: don’t rely on visual cues alone; run a test transaction through the entire funnel from shop page to thank‑you page.
- Keep accessibility in mind: color contrast on sale badges, keyboard‑navigable filter panels, and visible focus outlines.
Building a fully custom WooCommerce shop page in Elementor Pro isn’t just about aesthetics — it’s about gaining total control over the buying journey. By following this step‑by‑step blueprint, you’re now equipped to design a page that loads fast, looks unique, and is precisely tuned to your customers’ needs. No more fighting with archaic template files; the future of flexible e‑commerce design is right inside your WordPress dashboard.